
 Bookmark
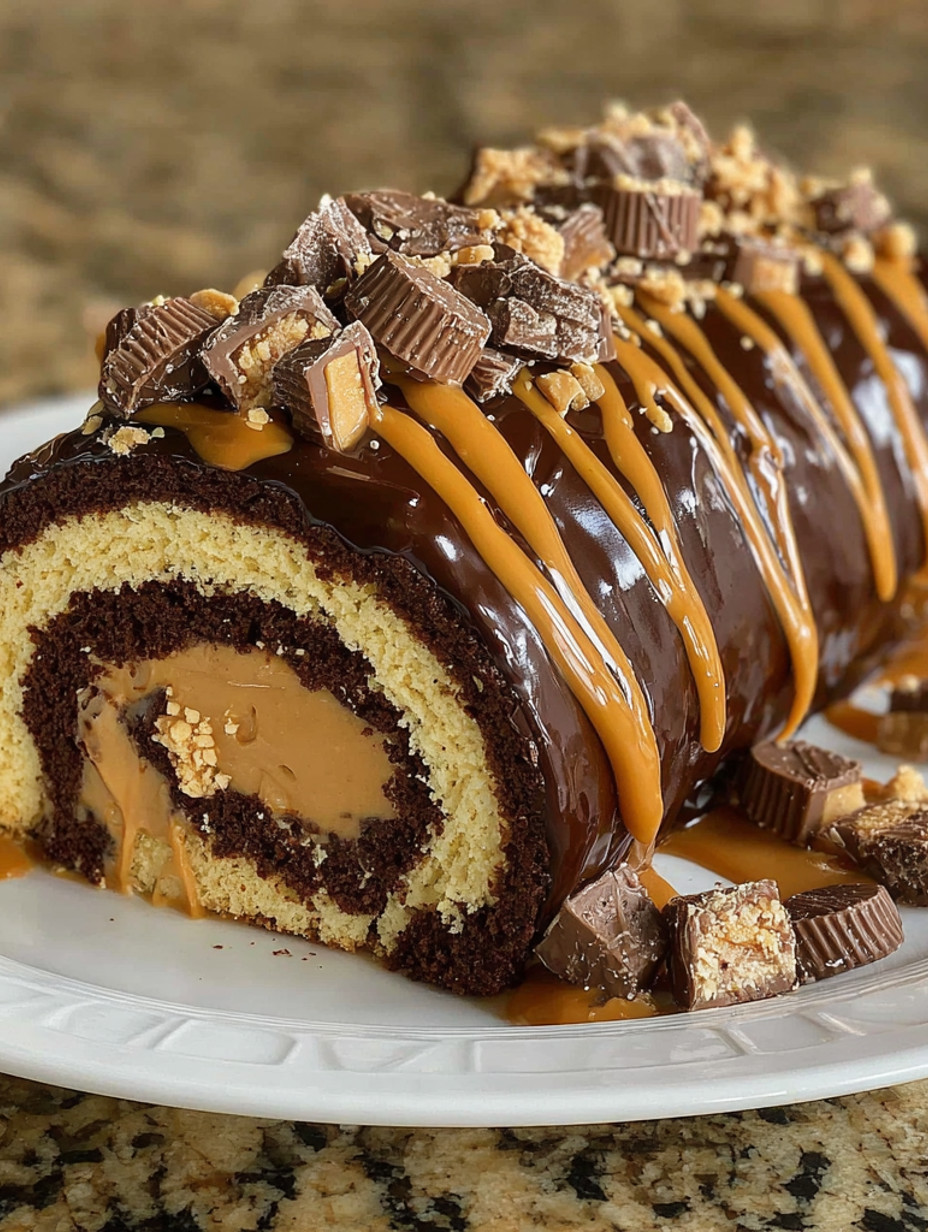
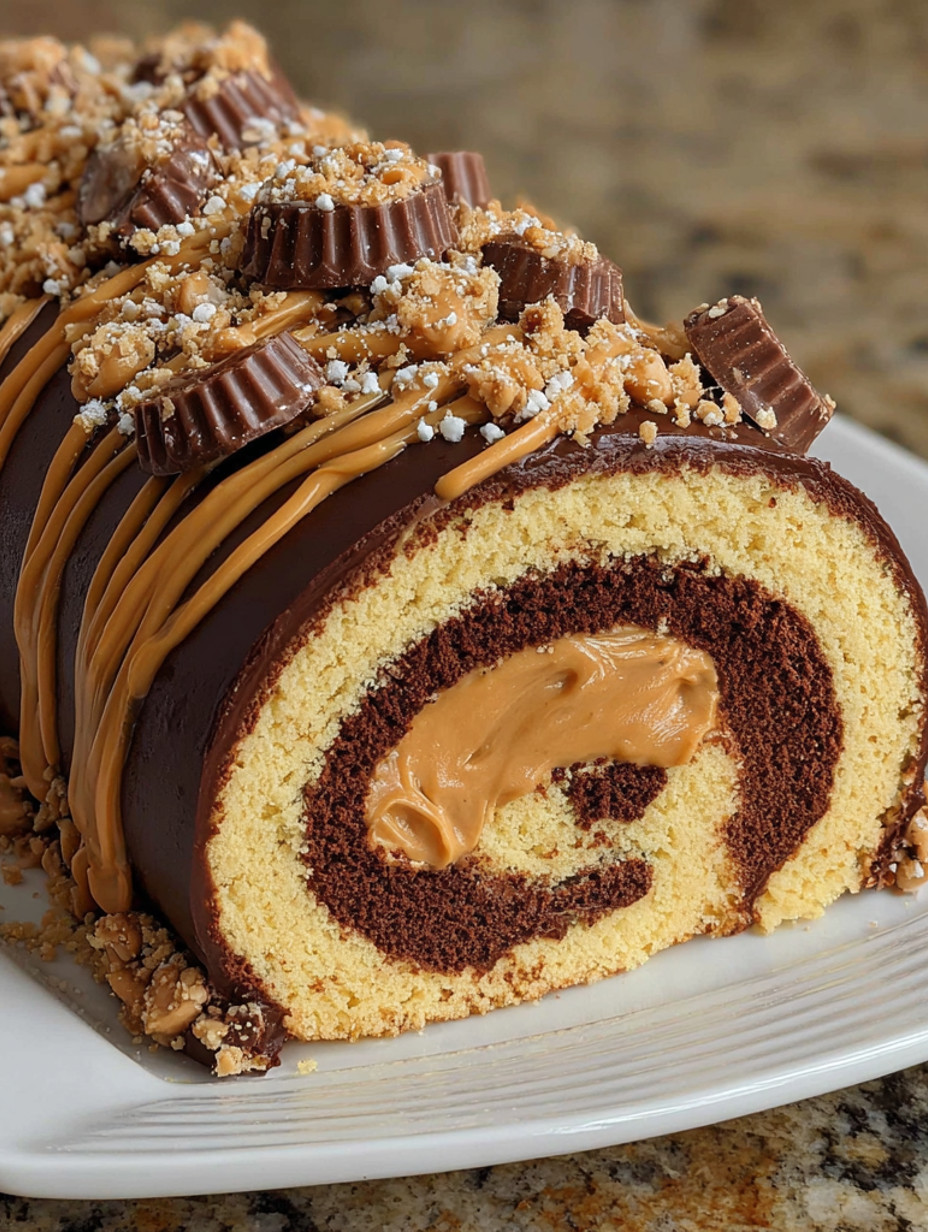
This peanut butter cup chocolate roll cake is a quick and impressive dessert that wraps rich chocolate sponge around a creamy peanut butter filling. It delivers big on flavor with minimal time and no special tools required. The result is soft moist cake with a swirl of decadent filling studded with chocolate peanut butter candy in every slice.
I first baked this for my nephew’s birthday when I was short on time but needed something showstopping. Everyone was speechless as I sliced into it and now I get requests to bring it to every family party.
Ingredients
- Large eggs: provide volume and structure so the cake is soft but stable when rolled
- All purpose flour: creates a light tender base that still holds together
- Unsweetened cocoa powder: adds intense chocolate flavor without too much sweetness
- Baking powder: helps the sponge rise just enough without making it too airy to roll
- Salt: balances sweetness and deepens the cocoa flavor
- Granulated sugar: helps aerate the eggs while sweetening the sponge
- Powdered sugar: keeps the filling smooth and dusts the towel to prevent sticking
- Smooth peanut butter: works best from shelf stable brands to avoid oily texture
- Heavy cream: whips into a soft light base for the filling
- Mini peanut butter cups: give texture and bursts of rich chocolate peanut flavor
Step-by-Step Instructions
- Prepare the Oven and Pan:
- Preheat the oven to three hundred fifty degrees Fahrenheit. Line a rimmed baking sheet with parchment that extends up the sides. Spray underneath the paper lightly to help it stay in place when spreading the batter.
- Beat Eggs and Sugar:
- In a mixing bowl beat eggs and granulated sugar on high speed for five minutes. The mixture should become pale and triple in volume. This builds the structure of the cake by incorporating air.
- Sift and Fold the Dry Ingredients:
- Sift together flour cocoa powder baking powder and salt. Use a rubber spatula to fold them into the egg mixture gently in a figure eight motion. This keeps the batter airy and prevents deflating.
- Bake the Sponge:
- Spread the batter into an even layer using an offset spatula. Tap the pan lightly to release large air bubbles. Bake for ten to twelve minutes. The top should spring back lightly when touched.
- Dust and Invert:
- While the cake bakes prepare a clean kitchen towel by dusting it generously with powdered sugar. When the cake comes out immediately invert it onto the towel. Carefully peel away the parchment.
- Roll While Warm:
- Starting at one short end roll the cake gently with the towel inside to support it. Let it cool completely rolled up to set its shape and prevent cracks later.
- Make the Filling:
- Whip cold heavy cream to soft peaks. Fold in powdered sugar and smooth peanut butter until evenly blended. The filling should be thick but spreadable. If it is stiff add a splash of cream.
- Unroll and Fill:
- Once the cake has cooled unroll it gently. Spread the filling in an even layer leaving a half inch border. Sprinkle the chopped peanut butter cups across the surface.
- Reroll and Chill:
- Use the towel to guide the cake into a tight roll without rolling the towel in this time. Wrap it and chill for at least thirty minutes to set before slicing.
 Bookmark
I always loved peanut butter chocolate ice cream as a kid and this cake hits those same notes in a more grown up form. The mini peanut butter cups give little surprises in every bite that make it hard to stop at one slice.
Storage Tips
Wrap the filled roll tightly in plastic wrap and store in the fridge for up to two days. For longer storage freeze the unfilled sponge rolled in the towel for up to one month. Thaw in the fridge before unrolling and filling.
Ingredient Substitutions
If you do not have mini peanut butter cups try chopped chocolate chips or caramel bits. Natural peanut butter can work if it is thoroughly mixed but may result in a looser filling.
Serving Suggestions
Dust the roll with extra powdered sugar before serving. For special occasions drizzle with chocolate ganache or add a scoop of vanilla ice cream on the side. Fresh berries make a nice contrast.
Cultural Context
This dessert puts a playful twist on the classic Swiss roll by combining American peanut butter candy with a European cake technique. It is a great example of how home baking can blend traditions into something new.
 Bookmark
Pro Tips
- Let the rolled cake cool completely before unrolling to avoid tearing
- Use parchment with overhang to lift the cake cleanly after baking
- Chill before slicing to get tidy professional looking pieces
Frequently Asked Questions About Recipes
- → Can I use natural peanut butter for the filling?
Yes, but make sure it's thoroughly mixed to avoid separation. A smoother texture will help maintain consistency in the filling.
- → How do I keep the roll cake from cracking?
Roll it while still warm using a sugar-dusted towel. This helps it hold shape and prevents drying out which leads to cracks.
- → Is this cake suitable to make ahead?
Definitely. You can prepare it a day or two in advance and refrigerate it tightly wrapped. It slices even better after chilling.
- → What can I use instead of mini peanut butter cups?
Try chopped roasted peanuts, chocolate chips, or caramel bits for texture and a different flavor profile.
- → Can I freeze the cake?
Yes, freeze the unfilled rolled sponge or the completed cake tightly wrapped. Thaw overnight in the fridge before serving.
- → How should I slice the roll cleanly?
Use a serrated knife and saw gently. Refrigerating for 30 minutes beforehand helps achieve neater slices.